One of the subjects getting a lot of focus on lately is the idea of makerspaces and 3D printing. I work at a High School where we do have some classes that work on creating things and even using a 3D printer as part of their assignments, but I had never used a 3D printer to do what many want to do in makerspaces: have students solve a problem by making the solution.
First, I needed a problem to solve that would allow me to use the 3D printer to create a solution. Luckily for me the previous week saw me trying to help a teacher record a class activity while they were gone. While I had some more advanced tools around, they were not available for this as it was a spur of the moment event. The best way was to just use the camera on a student laptop to record the discussion so the teacher could view it later. The issue was the fact that while recording with the camera on the Macbook Air, those that were being recorded could see the screen and were distracted by it. The camera is on the same side as the screen so if you wanted to use it to record anything, the screen is facing the same direction.
I thought it would be interesting if there was a way to record using the camera but not have the screen facing those that are being recorded. A mirror setup would work but they would have to be able to attach the computer. The idea of a periscope seemed to fit the problem that I had. I could easily design a periscope that would fit onto the top of the Macbook Air laptop and would reflect the light onto the camera from the other side of the screen.
Initial Design
As a physics teacher, I have worked with mirrors extensively and even used/designed periscopes in the classroom and knew how the angles between the mirrors was what was key. The mirrors had to have a 90 degree angle between them and pretty much a 45 degree angle with the horizontal. This was background knowledge that I had but that students would have to research or learn through interaction with the materials. I started sketching out my idea onto a piece of paper and tried out a few designs before making a decision about which one I wanted to go further with. I wanted a design that would be simple enough to build but also sturdy enough to work for awhile.
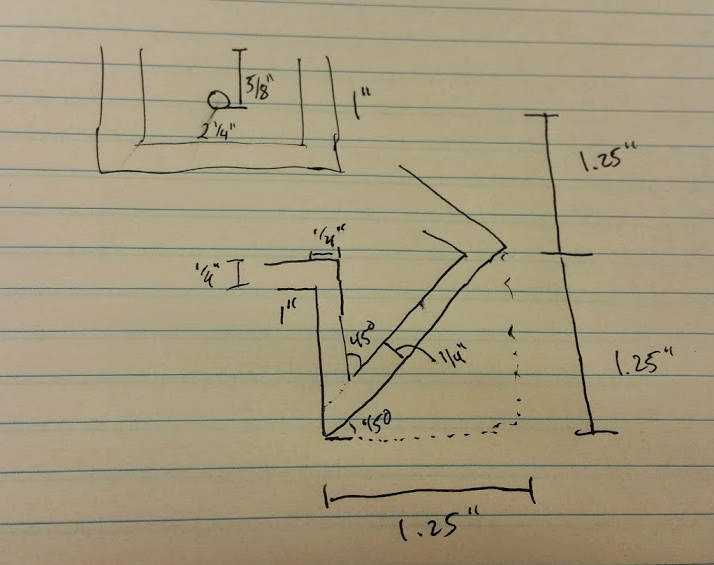
I measured the dimensions of the area on the laptop where the periscope would fit and added them to my drawing. I then calculated, using my awesome math skills, the dimensions for the rest of the design. I added the angles in first and then calculated the lengths of each side that I would need. I added these to my drawing and labeled anything I had to in order to make sure I was clear on what each side would look like and the dimensions it would have.
Google Sketchup
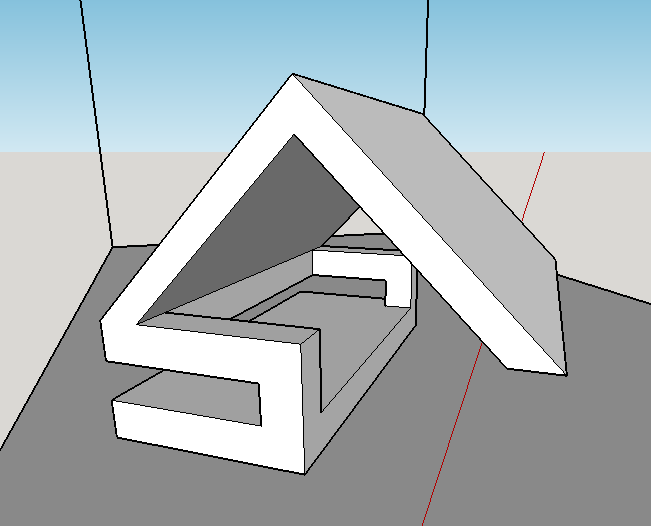
Once I had my initial idea down, it was time to create my object in Google Sketchup. Google Sketchup is a free program that you can download for students to use to create their 3D models. It was very simple to get started and it even had options for setting up for a 3D printer. There are many other uses for Sketchup, such as designing landscaping or drawing up a house plan, but I was able to quickly create shapes for my project. I like to learn by playing with the program but I knew that there were a ton of videos on YouTube that I could have used to help myself along when I got stuck. Every time that I got stuck, I would conduct a quick search using Google and try to find some tips to help myself along. I also knew others who had done this before so they were available to me to as assistance also.
It took a good hour or so to create my design as I was still new to Sketchup but the final design looked like it was going to work well. I did some quick reading of some tips on finalizing the model and found out that I still had some work to do. The properties of the shape showed that it was not a solid object, as it had no volume, which mean that I had some lines in there that needed to be removed. I slowly went through my model, making sure to remove anything that did not belong, and soon I had a solid object that had a volume. The big question I still had dealt with the fact that I had no supports in my design. Supports are needed since the 3D printer can not print in midair. Luckily I was able to read that the Makerbot software can easily add supports so your project can be completed. The next step was to send the file to the Makerbot and start printing.
Continued in the next post…….
