When working on projects or larger assignments in class, it can be very helpful for the students if there is a collection of resources to help them get started or to help them focus on. You can do this using a site or other tool but there is a very easy way to do this using Evernote. You need to first create an Evernote account and then install it on your computer, I suggest installing the Chrome extension and app as this will be the easiest. Once you have them installed you are ready to get started.
(Thanks to the post at http://www.alicekeeler.com/teachertech/2014/02/23/use-a-gif-instead-of-youtube/ for showing how to do create the gifs.)
1. Create a new Notebook in Evernote that will contain the resources you want to share with students.
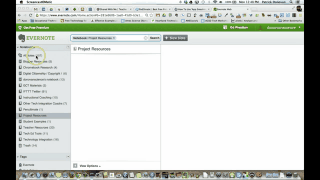
2. Use the Evernote Chrome extension to save the resource in the format you want, I would suggest either as a bookmark or as a full page (you can annotate and add to the full page so if you want to add notes or highlight sections you can).
3. Go back to your Evernote Notebook and share out the folder publicly to get a link. Post that link in class or digitally and now your students will be able to see the resources in that Notebook. You can keep adding to the Notebook and they will be able to see that.

You can watch the tutorial below to get led step by step on how to do this.
